
集体矩阵乘法#
张量并行 (TP) 和数据并行 (DP) 是最常用的并行技术,它们可以让我们将越来越大的模型装入多个加速器。然而,它们的联合使用意味着在我们的程序中,数据有时会以一种不能直接执行操作而需要额外通信的方式分片。一个常见的问题发生在 Transformer 的 MLP 块的开头。此时,输入激活可能按批次轴分片 (DP),而权重可能按输出特征维度分区 (TP)。
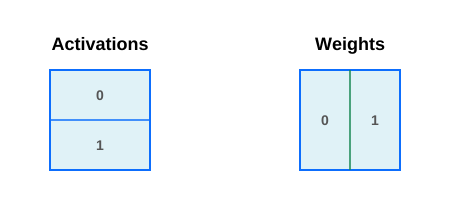
收缩维度未分片,所以看起来我们可以直接相乘输入,但有一个问题:输出不能沿同一设备轴在两个维度上都分片!
有一个简单的解决方案:我们可以 all-gather 激活或权重(这里我们关注激活端),然后用另一个分片的操作数执行本地矩阵乘法。这个简单的策略有效,但有一个缺点:我们不能在 all-gather 运行时开始计算矩阵乘法!这意味着我们的硬件利用率不足!
为了提高利用率,我们将展示如何轻松实现一个 Pallas:MGPU 内核,该内核将跨设备通信与矩阵乘法重叠,在足够大的问题形状上实现近乎最佳的利用率。我们的实现大量使用了 NVLINK 互连,这使我们能够在不涉及主机的情况下执行高带宽的 GPU 间通信。
这种方法已经带来了可观的性能提升!如果我们考虑一个 f16 矩阵乘法,M=1024,K=4096,N=4096,且数据呈正态分布,我们的基准测试表明,在单个 H100 上大约需要 43us。在下表中,我们扩展了 M 维度,以便每个分片的形状为 M=1024。我们可以通过将本地运行时估计值乘以设备数,并为每轮通信增加约 6us(与同步相关的内存围栏成本很高)来计算分布式内核执行的预期下限。对我们的内核进行基准测试得出了以下结果:
设备数 |
内核时间 |
TC 利用率 |
下限 |
TC 利用率 |
参考时间 |
TC 利用率 |
|---|---|---|---|---|---|---|
2 |
102us |
68% |
92us |
75% |
147us |
47% |
4 |
212us |
66% |
190us |
73% |
290us |
48% |
8 |
436us |
64% |
386us |
72% |
565us |
49% |
正如您所见,这里仍有一些优化机会,但至少与 NCCL all gather 和 cuBLAS matmul 的基线实现相比,我们的利用率有了显著提高。
算法概述:环形 All-Gather#
为了计算 AllGather(A) @ B,我们在参与的 D 个设备上形成一个环。在每一步,设备接收最后一个分片(从其本地分片开始),并将其传递给环中的下一个设备。在发送进行的同时,我们计算最后一个接收到的 A 分片与本地 B 分片之间的矩阵乘法。
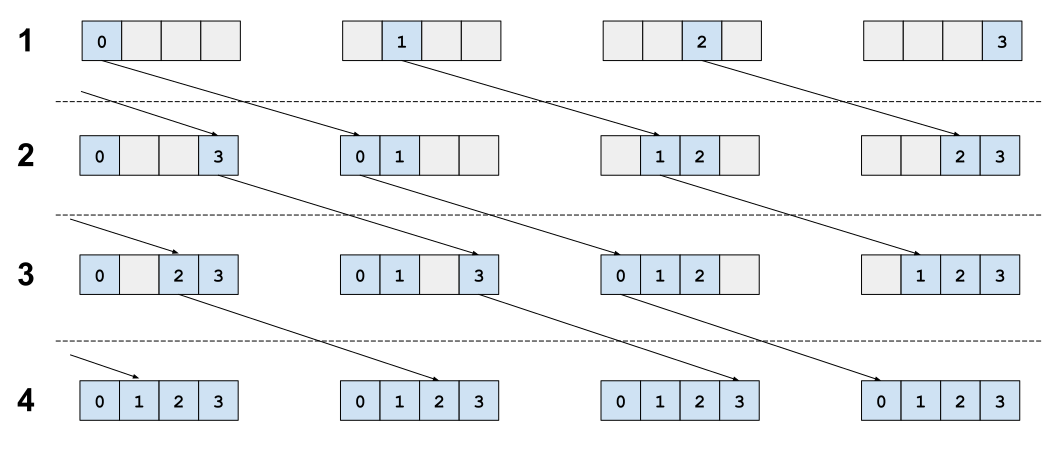
更正式地说,该算法进行 D 步。在第 i 步(0 <= i < D),设备 d 从设备 (d + 1) % D 接收分片 A_{(d + i) % D}(第一步我们实际上没有接收),计算 A_{(d + i) % D} @ B_d,并将结果写入输出缓冲区的切片。与计算同时,设备 d 将分片 A_{(i + d) % D} 发送给设备 (i - 1) % D,供其在第 i + 1 步使用(最后一步我们不发送)。经过 D 步后,设备 d 将看到 A 的所有分片,并计算出完整的输出。
用于设备间通信的 Pallas 原始函数#
我们使用三个 Pallas 函数进行设备间通信
plgpu.remote_ref(ref, device_id):此函数获取全局内存 (GMEM) 中缓冲区的引用,并返回同一缓冲区在由device_id指定的*不同*设备上的引用。当通过 NVLINK 通信时,即使数据位于远程内存中,也可以直接读取或写入此引用。pl.semaphore_signal(sem, device_id=...):递增目标设备上的信号量。这通常用于指示某个进程已完成,例如,当我们通知远程设备已发送其正在等待的数据时。pl.semaphore_wait(sem, value=..., decrement=...):阻塞直到本地信号量达到某个值。如果 decrement 为True(默认),则信号量的该值将按等待的量减少。如果为False,操作效率更高,但在等待完成时不会修改信号量的值。这通常用于等待来自远程设备的信号。
使用 Pallas 实现#
注意
在此,我们仅展示内核的简化版本,以便我们专注于最有趣的细节。您可以在 我们的示例目录中找到完整的实现。
首先,我们专注于内核的设置。对于计算部分,我们将重用 hopper_matmul_mgpu 中优化后的矩阵乘法内核实现。由于计算内核将使用 warp 专用化,因此我们使用 3 个 Pallas 线程。它也是持久的,这意味着我们启动的网格大小等于 SM 的数量(从 JAX 设备的 .core_count 查询)。计算内核使用 pl.run_scoped 进行 SMEM 分配,因此我们不使用 scratch_shapes。
def all_gather_lhs_matmul(
    lhs: jax.Array,
    rhs: jax.Array,
    axis_name,
    *,
    config: hopper_matmul_mgpu.TuningConfig,
    dtype: jnp.dtype = jnp.bfloat16,
) -> jax.Array:
  if (num_devices := jax.device_count()) != jax.process_count():
    raise ValueError("The kernel only supports one device per process")
  if (axis_size := lax.axis_size(axis_name)) != num_devices:
    raise ValueError("The kernel can only work over all devices in a Mesh.")
  ...

  m_shard, k = lhs.shape
  _, n_shard = rhs.shape
  tile_m, tile_n, tile_k = config.tile_m, config.tile_n, config.tile_k
  cta_tile_m = tile_m * (1 + (config.wg_dimension == MatmulDimension.M))
  num_sms = jax.extend.backend.get_default_device().core_count

  def kernel_body(lhs_local_ref, rhs_ref, out_ref, scratch_ref):
    ...

  result, _ = plgpu.kernel(
      kernel_body,
      out_shape=[
          # The output (with M gathered)
          jax.ShapeDtypeStruct((axis_size * m_shard, n_shard), dtype),
          # A scratch buffer for LHS all-gather
          jax.ShapeDtypeStruct((axis_size - 1, m_shard, k), dtype),
      ],
      grid=(num_sms,),
      num_threads=3, # The matmul kernel uses 3 threads: 2 compute and 1 memory
      thread_name="wg",
  )(lhs, rhs)
  return result
上面的内核有两个输出。第一个是我们原始函数的实际结果,第二个用作接收左侧操作数的暂存空间。请注意,我们可以将第一个轴收缩到小于 axis_size - 1,但在那种情况下,我们需要向发送设备引入反压,这需要额外的昂贵通信。
注意
您可以在 TPU 分布式通信指南 中看到如何处理这种反压。
现在让我们看看内核主体的概述
def all_gather_lhs_matmul(...):
  def kernel_body(lhs_local_ref, rhs_ref, out_ref, scratch_ref, out_smem, received_sem):
    wg_idx = lax.axis_index("wg")
    dev_id = lax.axis_index(axis_name)
    # This device sends to dev_id - 1, forming a ring.
    send_dev_id = lax.rem(dev_id + axis_size - 1, axis_size)
    send_scratch_ref = plgpu.remote_ref(scratch_ref, send_dev_id)

    def device_step(lhs_source_ref, device_offset):
      # Invariant: lhs_source_ref contains A_{(dev_id + device_offset) % D}
      # and is ready to be used for computation.

      ...

    # We peel the first step to read data directly from lhs_local_ref.
    device_step(lhs_local_ref, 0)
    @pl.loop(1, num_devices)
    def _device_loop(device_offset):
      device_step(scratch_ref.at[device_offset - 1], device_offset)
我们通过查询 lax.axis_index(axis_name) 来定位我们在环中的位置,并计算我们将发送数据到的下一个设备的索引(send_dev_id)。然后,我们根据设备数量循环调用 device_body。我们剥离循环的第一步,因为仅在此步中,我们将本地引用用作发送源(之后,发送源自先前在暂存缓冲区中接收的数据)。
我们现在可以开始研究主循环了
def all_gather_lhs_matmul(...):
  ...

  def kernel_body(lhs_local_ref, rhs_ref, out_ref, scratch_ref, out_smem, received_sem):
    ...

    def device_step(lhs_source_ref, device_offset):
      # We are computing block (dev_id + device_offset) % D of the output.
      out_device_idx = lax.rem(device_offset + dev_id, axis_size)
      out_device_m_slice = pl.ds(out_device_idx * m_shard, m_shard)

      # In step `device_offset`, we send A_{(dev_id + device_offset) % D} to
      # the next device in the ring, into scratch slot `device_offset`.
      # We also don't send on the last step since that would return the data
      # back to its original source.
      next_scratch_slot = device_offset
      is_send_wg = wg_idx == 0 # Only one warpgroup per CTA sends
      has_send_space = next_scratch_slot < axis_size - 1
      should_send = is_send_wg & has_send_space

      # This function will be called by hopper_matmul_mgpu.kernel in the body
      # of its pipeline. We use it to take the tile of LHS loaded into SMEM and
      # issue a TMA send to the next device in the ring.
      def send_lhs(m_idx, n_idx, k_idx, a_smem, b_smem, send_ref, should_send):
        del b_smem  # Unused.
        # We only send when n_idx == 0 to avoid sending the same data
        # multiple times when revisiting the left operand.
        @pl.when(should_send & jnp.bool(n_idx == 0))
        def _():
          k_slice = pl.ds(k_idx * tile_k, tile_k)
          m_slice = pl.ds(m_idx * cta_tile_m, cta_tile_m)
          plgpu.copy_smem_to_gmem(a_smem, send_ref.at[m_slice, k_slice])
          # Wait for previous copies to complete. We pass in delay_release=1
          # to the pipeline in the matmul kernel to ensure that it doesn't
          # overwrite the input until at least the next step completes, but it
          # will not wait any longer.
          plgpu.wait_smem_to_gmem(1, wait_read_only=True)

      hopper_matmul_mgpu.kernel(
          lhs_source_ref,  # LHS shard for this step
          rhs_ref,  # RHS shard is always the same
          out_ref.at[out_device_m_slice],  # Slice of output to update
          out_smem,
          config=config,
          pipeline_callback=functools.partial(
              send_lhs,
              send_ref=send_scratch_ref.at[next_scratch_slot],
              should_send=should_send,
          ),
          delay_release=1,
      )

      # Wait for the next scratch to arrive for the next step's computation.
      # Each device signals its neighbor when it has finished sending.
      @pl.when(should_send)
      def _signal():
        # Make sure our remote copy is done, then signal.
        plgpu.wait_smem_to_gmem(0, wait_read_only=False)
        pl.semaphore_signal(received_sem, device_id=send_dev_id)
      @pl.when(has_send_space)
      def _wait():
        # Here, we wait for the data to arrive from the previous device in the
        # ring. At each step, will expect to receive a signal from each SM.
        # We use decrement=False to make this operation slightly faster, but
        # this also means that we need to scale the expected number of signals
        # by the number of steps taken so far (as the value only increases).
        pl.semaphore_wait(received_sem, value=(device_offset + 1) * num_sms, decrement=False)

    ...
这里按顺序发生了几件事
我们首先计算将在循环的当前步骤中计算的输出切片。
然后,我们调用优化的矩阵乘法内核,但将其注入一个
pipeline_callback。我们利用计算内核必须将左操作数提取到 SMEM 的事实,并指示 TMA 引擎异步地将本地数据流式传输到下一个设备。流量由硬件通过 NVLINK 透明路由。值得注意的是,我们只从一个计算线程发出发送,并且仅在第一次访问左操作数时进行(它可能会被多次重新加载以计算多个输出块)。最后,发送线程确保发送已完成,并向接收设备上的
received_sem发送信号以指示这一点。之后,所有线程都会等待,直到它们确定下一轮循环所需的所有数据都已接收完毕(最后一轮跳过等待)。
将内核集成到 JAX#
要调用内核,您需要将其包装到 jax.shard_map 中
m_shard, n_shard, k = 1024, 1024, 1024
dtype = jnp.float16
mesh = jax.make_mesh((jax.device_count(),), ("x",),
                     axis_types=(jax.sharding.AxisType.Explicit,))
with jax.set_mesh(mesh):
  a = jax.random.normal(jax.random.key(1), (m_shard * jax.device_count(), k), dtype)
  b = jax.random.normal(jax.random.key(2), (k, n_shard * jax.device_count()), dtype)
  a = jax.sharding.reshard(a, P("x", None))
  b = jax.sharding.reshard(b, P(None, "x"))

  # Example config for 8xH100. You might need to retune to your shape.
  config = hopper_matmul_mgpu.TuningConfig(
      tile_m=128, tile_n=128, tile_k=64, max_concurrent_steps=4,
      grid_minor_dim=MatmulDimension.N, grid_tile_width=8,
      wg_dimension=MatmulDimension.N,
  )

  kernel = jax.jit(
      jax.shard_map(
          functools.partial(all_gather_lhs_matmul, axis_name="x", config=config),
          out_specs=P(None, "x"),
          check_vma=False,
      )
  )
  c = kernel(a, b)