
多控制器JAX(又名多进程/多主机JAX)简介#
通过阅读本教程,您将学习如何将JAX计算扩展到单个主机无法容纳的更多设备上,例如在GPU集群、云TPU Pod或多个仅限CPU的机器上运行时。
主要思想
运行多个Python进程,我们有时称之为“控制器”。我们可以在每个主机上运行一个(或多个)进程。
使用
jax.distributed.initialize()初始化集群.一个
jax.Array可以跨越所有进程,如果每个进程对其应用相同的JAX函数,就像是针对一个大型设备进行编程。使用与单控制器JAX相同的统一分片机制来控制数据如何分布以及计算如何并行化。XLA在可用时会自动利用主机之间的高速网络链接,如TPU ICI或NVLink,否则使用可用的主机网络(例如以太网、InfiniBand)。
所有进程(通常)运行相同的Python脚本。您编写此Python代码的方式几乎与单个进程完全相同——只需运行它的多个实例,JAX会处理其余部分。换句话说,除了数组创建之外,您可以像对待一台连接了所有设备的巨型机器一样编写JAX代码。
本教程假设您已阅读过分布式数组和自动并行化,该文章是关于单控制器JAX的。
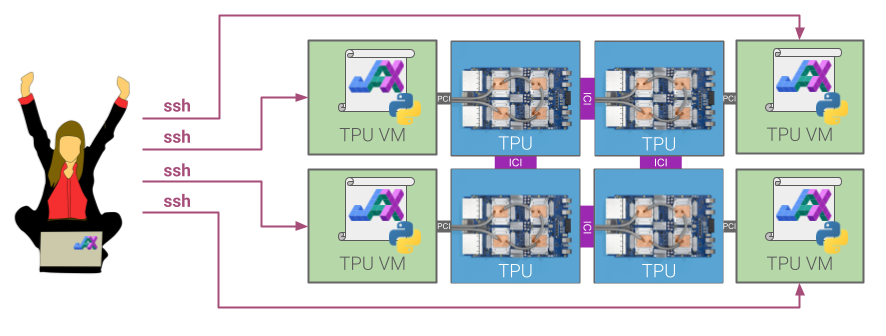
多主机TPU Pod的图示。Pod中的每个主机(绿色)通过PCI连接到一块包含四个TPU芯片(蓝色)的板卡。TPU芯片本身通过高速片间互连(ICI)连接。JAX Python代码在每个主机上运行,例如通过ssh。每个主机上的JAX进程彼此感知,允许您协调整个Pod芯片的计算。GPU、CPU和其他支持JAX的平台也是同样的原理!#
简易示例#
在我们定义术语并详细介绍之前,这里有一个简易示例:创建一个跨进程的jax.Array值,并对其应用jax.numpy函数。
# call this file toy.py, to be run in each process simultaneously

import jax
import jax.numpy as jnp
from jax.sharding import NamedSharding, PartitionSpec as P
import numpy as np

# in this example, get multi-process parameters from sys.argv
import sys
proc_id = int(sys.argv[1])
num_procs = int(sys.argv[2])

# initialize the distributed system
jax.distributed.initialize('localhost:10000', num_procs, proc_id)

# this example assumes 8 devices total
assert jax.device_count() == 8

# make a 2D mesh that refers to devices from all processes
mesh = jax.make_mesh((4, 2), ('i', 'j'))

# create some toy data
global_data = np.arange(32).reshape((4, 8))

# make a process- and device-spanning array from our toy data
sharding = NamedSharding(mesh, P('i', 'j'))
global_array = jax.device_put(global_data, sharding)
assert global_array.shape == global_data.shape

# each process has different shards of the global array
for shard in global_array.addressable_shards:
  print(f"device {shard.device} has local data {shard.data}")

# apply a simple computation, automatically partitioned
global_result = jnp.sum(jnp.sin(global_array))
print(f'process={proc_id} got result: {global_result}')
在这里,mesh包含来自所有进程的设备。我们用它来创建global_array,它在逻辑上是一个共享数组,分布存储在来自所有进程的设备上。
每个进程必须以相同的顺序对global_array应用相同的操作。XLA会自动划分这些计算,例如插入通信集合来计算完整数组的jnp.sum。我们可以打印最终结果,因为它的值在进程间是复制的。
我们可以在CPU上本地运行此代码,例如使用4个进程和每个进程2个CPU设备
export JAX_NUM_CPU_DEVICES=2
num_processes=4

range=$(seq 0 $(($num_processes - 1)))

for i in $range; do
  python toy.py $i $num_processes > /tmp/toy_$i.out &
done

wait

for i in $range; do
  echo "=================== process $i output ==================="
  cat /tmp/toy_$i.out
  echo
done
输出
=================== process 0 output ===================
device TFRT_CPU_0 has local data [[0 1 2 3]]
device TFRT_CPU_1 has local data [[4 5 6 7]]
process=0 got result: -0.12398731708526611

=================== process 1 output ===================
device TFRT_CPU_131072 has local data [[ 8  9 10 11]]
device TFRT_CPU_131073 has local data [[12 13 14 15]]
process=1 got result: -0.12398731708526611

=================== process 2 output ===================
device TFRT_CPU_262144 has local data [[16 17 18 19]]
device TFRT_CPU_262145 has local data [[20 21 22 23]]
process=2 got result: -0.12398731708526611

=================== process 3 output ===================
device TFRT_CPU_393216 has local data [[24 25 26 27]]
device TFRT_CPU_393217 has local data [[28 29 30 31]]
process=3 got result: -0.12398731708526611
这看起来与单控制器JAX代码没有太大区别,事实上,这正是您编写相同程序的单控制器版本的方式!(从技术上讲,单控制器不需要调用jax.distributed.initialize(),但这样做也无妨。)让我们从单个进程运行相同的代码
JAX_NUM_CPU_DEVICES=8 python toy.py 0 1
输出
device TFRT_CPU_0 has local data [[0 1 2 3]]
device TFRT_CPU_1 has local data [[4 5 6 7]]
device TFRT_CPU_2 has local data [[ 8  9 10 11]]
device TFRT_CPU_3 has local data [[12 13 14 15]]
device TFRT_CPU_4 has local data [[16 17 18 19]]
device TFRT_CPU_5 has local data [[20 21 22 23]]
device TFRT_CPU_6 has local data [[24 25 26 27]]
device TFRT_CPU_7 has local data [[28 29 30 31]]
process=0 got result: -0.12398731708526611
数据被分片到单个进程的八个设备上,而不是四个进程的八个设备上,但除此之外,我们正在对相同的数据运行相同的操作。
术语#
有必要明确一些术语。
我们有时将每个运行JAX计算的Python进程称为控制器,但这两个术语本质上是同义词。
每个进程都有一组本地设备,这意味着它可以在不涉及任何其他进程的情况下,将数据传输到这些设备的内存中并从这些设备的内存中传输数据,并在这些设备上运行计算。本地设备通常通过PCI等方式物理连接到进程对应的宿主机。一个设备只能是本地于一个进程;也就是说,本地设备集是互不相交的。进程的本地设备可以通过评估jax.local_devices()来查询。我们有时使用术语可寻址的来表示与本地相同的含义。
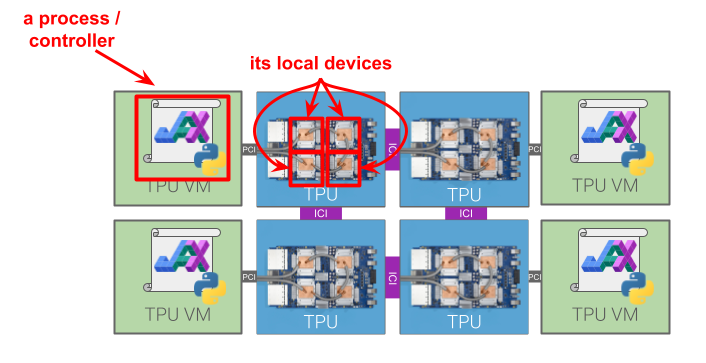
流程/控制器和本地设备如何融入更大的多主机集群的图示。“全局设备”是集群中的所有设备。#
所有进程的设备被称为全局设备。全局设备的列表通过jax.devices()查询。所有设备的列表是通过在所有进程上运行jax.distributed.initialize()来填充的,这会设置一个连接这些进程的简单分布式系统。
我们经常使用术语全局和本地来描述进程跨越和进程本地的概念。例如,“本地数组”可能是一个仅对单个进程可见的numpy数组,而JAX“全局数组”在概念上对所有进程可见。
设置多个JAX进程#
在实践中,设置多个JAX进程与在单个主机上运行的简易示例略有不同。我们通常在单独的主机上启动每个进程,或者在多个主机上每个主机有多个进程。我们可以直接使用ssh,或者使用像Slurm或Kubernetes这样的集群管理器来完成。无论如何,您必须在每个主机上手动运行JAX程序!JAX不会从单个程序调用中自动启动多个进程。
无论它们如何启动,Python进程都需要运行jax.distributed.initialize()。在使用Slurm、Kubernetes或任何云TPU部署时,我们可以运行不带参数的jax.distributed.initialize(),因为它们会自动填充。初始化系统意味着我们可以运行jax.devices()来报告所有进程中的所有设备。
警告
在运行jax.devices()、jax.local_devices()或在设备上运行任何计算(例如使用jax.numpy)之前,必须调用jax.distributed.initialize()。否则JAX进程将不会感知到任何非本地设备。(使用jax.config()或其他不访问设备的功能是没问题的。)如果您在访问任何设备后不小心调用了jax.distributed.initialize(),它将引发错误。
GPU示例#
我们可以在GPU机器集群上运行多控制器JAX。例如,在Google Cloud上创建四个虚拟机,每个虚拟机带有两个GPU后,我们可以在每个虚拟机上运行以下JAX程序。在这个例子中,我们显式地为jax.distributed.initialize()提供了参数。协调器地址、进程ID和进程数量从命令行读取。
# In file gpu_example.py...

import jax
import sys

# Get the coordinator_address, process_id, and num_processes from the command line.
coord_addr = sys.argv[1]
proc_id = int(sys.argv[2])
num_procs = int(sys.argv[3])

# Initialize the GPU machines.
jax.distributed.initialize(coordinator_address=coord_addr,
                           num_processes=num_procs,
                           process_id=proc_id)
print("process id =", jax.process_index())
print("global devices =", jax.devices())
print("local devices =", jax.local_devices())
例如,如果第一个虚拟机的地址是192.168.0.1,那么您将在第一个虚拟机上运行python3 gpu_example.py 192.168.0.1:8000 0 4,在第二个虚拟机上运行python3 gpu_example.py 192.168.0.1:8000 1 4,以此类推。在所有四个虚拟机上运行JAX程序后,第一个进程打印以下内容。
process id = 0
global devices = [CudaDevice(id=0), CudaDevice(id=1), CudaDevice(id=2), CudaDevice(id=3), CudaDevice(id=4), CudaDevice(id=5), CudaDevice(id=6), CudaDevice(id=7)]
local devices = [CudaDevice(id=0), CudaDevice(id=1)]
该进程成功地将所有八个GPU视为全局设备,以及它自己的两个本地设备。同样地,第二个进程打印以下内容。
process id = 1
global devices = [CudaDevice(id=0), CudaDevice(id=1), CudaDevice(id=2), CudaDevice(id=3), CudaDevice(id=4), CudaDevice(id=5), CudaDevice(id=6), CudaDevice(id=7)]
local devices = [CudaDevice(id=2), CudaDevice(id=3)]
该虚拟机看到相同的全局设备,但拥有一组不同的本地设备。
TPU示例#
作为另一个示例,我们可以在Cloud TPU上运行。创建v5litepod-16(它有4台主机)后,我们可能想测试是否可以连接这些进程并列出所有设备
$ TPU_NAME=jax-demo
$ EXTERNAL_IPS=$(gcloud compute tpus tpu-vm describe $TPU_NAME --zone 'us-central1-a' \
                 | grep externalIp | cut -d: -f2)
$ cat << EOF > demo.py
import jax
jax.distributed.initialize()
if jax.process_index() == 0:
  print(jax.devices())
EOF
$ echo $EXTERNAL_IPS | xargs -n 1 -P 0 bash -c '
scp demo.py $0:
ssh $0 "pip -q install -U jax[tpu]"
ssh $0 "python demo.py" '
这里我们使用xargs并行运行多个ssh命令,每个命令都在其中一台TPU主机上运行相同的Python程序。在Python代码中,我们使用jax.process_index()仅在一个进程上打印。这是它打印的内容
[TpuDevice(id=0, process_index=0, coords=(0,0,0), core_on_chip=0), TpuDevice(id=1, process_index=0, coords=(1,0,0), core_on_chip=0), TpuDevice(id=4, process_index=0, coords=(0,1,0), core_on_chip=0), TpuDevice(id=5, process_index=0, coords=(1,1,0), core_on_chip=0), TpuDevice(id=2, process_index=1, coords=(2,0,0), core_on_chip=0), TpuDevice(id=3, process_index=1, coords=(3,0,0), core_on_chip=0), TpuDevice(id=6, process_index=1, coords=(2,1,0), core_on_chip=0), TpuDevice(id=7, process_index=1, coords=(3,1,0), core_on_chip=0), TpuDevice(id=8, process_index=2, coords=(0,2,0), core_on_chip=0), TpuDevice(id=9, process_index=2, coords=(1,2,0), core_on_chip=0), TpuDevice(id=12, process_index=2, coords=(0,3,0), core_on_chip=0), TpuDevice(id=13, process_index=2, coords=(1,3,0), core_on_chip=0), TpuDevice(id=10, process_index=3, coords=(2,2,0), core_on_chip=0), TpuDevice(id=11, process_index=3, coords=(3,2,0), core_on_chip=0), TpuDevice(id=14, process_index=3, coords=(2,3,0), core_on_chip=0), TpuDevice(id=15, process_index=3, coords=(3,3,0), core_on_chip=0)]
太棒了,看看所有这些TPU核心!
Kubernetes示例#
在Kubernetes集群上运行多控制器JAX在精神上与上面的GPU和TPU示例几乎相同:每个pod都运行相同的Python程序,JAX发现其对等节点,并且集群的行为就像一台巨型机器。
容器镜像 - 从一个支持JAX的镜像开始,例如Google Artifact Registry上的公共JAX AI镜像之一(TPU / GPU)或NVIDIA的(NGC / JAX-Toolbox)。
工作负载类型 - 使用JobSet或indexed Job。每个副本对应一个JAX进程。
服务账户 - JAX需要权限来列出属于作业的Pod,以便进程发现其对等节点。一个最小化的RBAC设置在examples/k8s/svc-acct.yaml中提供。
下面是一个启动两个副本的最小JobSet。请将占位符(镜像、GPU数量以及任何私有注册表秘钥)替换为与您的环境匹配的值。
apiVersion: jobset.x-k8s.io/v1alpha2
kind: JobSet
metadata:
  name: jaxjob
spec:
  replicatedJobs:
  - name: workers
    template:
      spec:
        parallelism: 2
        completions: 2
        backoffLimit: 0
        template:
          spec:
            serviceAccountName: jax-job-sa  # kubectl apply -f svc-acct.yaml
            restartPolicy: Never
            imagePullSecrets:
              # https://k8s.io/docs/tasks/configure-pod-container/pull-image-private-registry/
            - name: null
            containers:
            - name: main
              image: null  # e.g. ghcr.io/nvidia/jax:jax
              imagePullPolicy: Always
              resources:
                limits:
                  cpu: 1
                  # https://k8s.io/docs/tasks/manage-gpus/scheduling-gpus/
                  nvidia.com/gpu: null
              command:
                - python
              args:
                - -c
                - |
                  import jax
                  jax.distributed.initialize()
                  print(jax.devices())
                  print(jax.local_devices())
                  assert jax.process_count() > 1
                  assert len(jax.devices()) > len(jax.local_devices())
应用清单并观察Pod完成
$ kubectl apply -f example.yaml
$ kubectl get pods -l jobset.sigs.k8s.io/jobset-name=jaxjob
NAME                       READY   STATUS      RESTARTS   AGE
jaxjob-workers-0-0-xpx8l   0/1     Completed   0          8m32s
jaxjob-workers-0-1-ddkq8   0/1     Completed   0          8m32s
作业完成后,检查日志以确认每个进程都看到了所有加速器
$ kubectl logs -l jobset.sigs.k8s.io/jobset-name=jaxjob
[CudaDevice(id=0), CudaDevice(id=1)]
[CudaDevice(id=0)]
[CudaDevice(id=0), CudaDevice(id=1)]
[CudaDevice(id=1)]
每个Pod都应该拥有相同的全局设备集和不同的本地设备集。此时,您可以将内联脚本替换为您的实际JAX程序。
一旦进程设置完毕,我们就可以开始构建全局jax.Array并运行计算。本教程中剩余的Python代码示例都应在运行jax.distributed.initialize()之后,在所有进程上同时运行。
网格、分片和计算可以跨越进程和主机#
使用JAX编程多个进程通常看起来就像编程单个进程一样,只是设备更多!主要例外在于数据进出JAX时,例如从外部数据源加载时。我们首先在这里介绍多进程计算的基础知识,它们与单进程计算大致相同。下一节将介绍一些数据加载的基础知识,即如何从非JAX源创建JAX数组。
回想一下,jax.sharding.Mesh将一组jax.Device与一系列名称配对,每个数组轴一个名称。通过使用来自多个进程的设备创建Mesh,然后将该网格用于jax.sharding.Sharding,我们可以构建分片在来自多个进程的设备上的jax.Array。
这是一个直接使用jax.devices()从所有进程获取设备来构造Mesh的示例
from jax.sharding import Mesh
mesh = Mesh(jax.devices(), ('a',))

# in this case, the same as
mesh = jax.make_mesh((jax.device_count(),), ('a',))  # use this in practice
在实践中,您应该使用jax.make_mesh()辅助函数,这不仅因为它更简单,而且因为它能够自动选择性能更好的设备排序,但我们在此处详细说明。默认情况下,它包含所有跨进程的设备,就像jax.devices()一样。
一旦我们有了网格,我们就可以在其上分片数组。有几种有效构建跨进程数组的方法,详见下一节,但目前为简单起见,我们将坚持使用jax.device_put
arr = jax.device_put(jnp.ones((32, 32)), NamedSharding(mesh, P('a')))
if jax.process_index() == 0:
  jax.debug.visualize_array_sharding(arr)
在进程0上,打印以下内容
┌───────────────────────┐
│         TPU 0         │
├───────────────────────┤
│         TPU 1         │
├───────────────────────┤
│         TPU 4         │
├───────────────────────┤
│         TPU 5         │
├───────────────────────┤
│         TPU 2         │
├───────────────────────┤
│         TPU 3         │
├───────────────────────┤
│         TPU 6         │
├───────────────────────┤
│         TPU 7         │
├───────────────────────┤
│         TPU 8         │
├───────────────────────┤
│         TPU 9         │
├───────────────────────┤
│        TPU 12         │
├───────────────────────┤
│        TPU 13         │
├───────────────────────┤
│        TPU 10         │
├───────────────────────┤
│        TPU 11         │
├───────────────────────┤
│        TPU 14         │
├───────────────────────┤
│        TPU 15         │
└───────────────────────┘
让我们尝试一个稍微更有趣的计算!
mesh = jax.make_mesh((jax.device_count() // 2, 2), ('a', 'b'))

def device_put(x, spec):
  return jax.device_put(x, NamedSharding(mesh, spec))

# construct global arrays by sharding over the global mesh
x = device_put(jnp.ones((4096, 2048)), P('a', 'b'))
y = device_put(jnp.ones((2048, 4096)), P('b', None))

# run a distributed matmul
z = jax.nn.relu(x @ y)

# inspect the sharding of the result
if jax.process_index() == 0:
  jax.debug.visualize_array_sharding(z)
  print()
  print(z.sharding)
在进程0上,打印以下内容
┌───────────────────────┐
│        TPU 0,1        │
├───────────────────────┤
│        TPU 4,5        │
├───────────────────────┤
│        TPU 8,9        │
├───────────────────────┤
│       TPU 12,13       │
├───────────────────────┤
│        TPU 2,3        │
├───────────────────────┤
│        TPU 6,7        │
├───────────────────────┤
│       TPU 10,11       │
├───────────────────────┤
│       TPU 14,15       │
└───────────────────────┘

NamedSharding(mesh=Mesh('a': 8, 'b': 2), spec=PartitionSpec('a',), memory_kind=device)
在这里,仅仅通过在所有进程上评估x @ y,XLA就会自动生成并运行分布式矩阵乘法。结果会像P('a', None)一样根据网格进行分片,因为在这种情况下,矩阵乘法包含了对'b'轴的psum。
警告
将JAX计算应用于跨进程数组时,为避免死锁和挂起,至关重要的是,所有具有参与设备的进程都必须以相同的顺序运行相同的计算。这是因为计算可能涉及集体通信屏障。如果数组所分片的一个设备因其控制器未发出相同的计算而未加入集体,则其他设备将一直等待。例如,如果只有前三个进程评估x @ y,而最后一个进程评估y @ x,那么计算很可能会无限期挂起。这种假设(即对跨进程数组的计算在所有参与进程上以相同顺序运行)在大多数情况下是未经检查的。
因此,避免多进程JAX中死锁的最简单方法是在每个进程上运行相同的Python代码,并注意任何依赖于jax.process_index()并包含通信的控制流。
如果一个跨进程数组分片在不同进程的设备上,那么对该数组执行需要数据在进程本地可用的操作(如打印)将是错误的。例如,如果在前面的示例中运行print(z),我们会看到
RuntimeError: Fetching value for `jax.Array` that spans non-addressable (non process local) devices is not possible. You can use `jax.experimental.multihost_utils.process_allgather` to print the global array or use `.addressable_shards` method of jax.Array to inspect the addressable (process local) shards.
要打印完整的数组值,我们必须首先确保它在进程之间是复制的(但不一定在每个进程的本地设备上),例如使用jax.device_put。在上面的示例中,我们可以在末尾写入
w = device_put(z, P(None, None))
if jax.process_index() == 0:
  print(w)
请注意不要将jax.device_put()写在if process_index() == 0之下,因为那样会导致死锁,只有进程0发起集体通信并无限期等待其他进程。jax.experimental.multihost_utils模块包含一些函数,可以更轻松地处理全局jax.Array(例如,jax.experimental.multihost_utils.process_allgather())。
或者,要仅对进程本地数据进行打印或执行其他Python操作,我们可以访问z.addressable_shards。访问该属性不需要任何通信,因此任何进程子集都可以在不需要其他进程的情况下完成此操作。该属性在jax.jit()下不可用。
从外部数据创建跨进程数组#
从外部数据源(例如来自数据加载器的numpy数组)创建跨进程jax.Array主要有三种方法
在所有进程上创建或加载完整数组,然后使用
jax.device_put()将其分片到设备上;在每个进程上创建或加载一个数组,该数组仅表示将本地分片并存储在该进程设备上的数据,然后使用
jax.make_array_from_process_local_data()将其分片到设备上;在每个进程的设备上创建或加载单独的数组,每个数组代表要存储在该设备上的数据,然后使用
jax.make_array_from_single_device_arrays()组装它们,而无需任何数据移动。
后两种方法在实践中最常使用,因为在每个进程中具体化完整的全局数据通常过于昂贵。
上面的简易示例使用了jax.device_put()。
jax.make_array_from_process_local_data()常用于分布式数据加载。它不如jax.make_array_from_single_device_arrays()通用,因为它不直接指定进程本地数据的哪个切片将存储在每个本地设备上。这在加载数据并行批次时很方便,因为具体哪个微批次放在哪个设备上并不重要。例如
# target (micro)batch size across the whole cluster
batch_size = 1024
# how many examples each process should load per batch
per_process_batch_size = batch_size // jax.process_count()
# how many examples each device will process per batch
per_device_batch_size = batch_size // jax.device_count()

# make a data-parallel mesh and sharding
mesh = jax.make_mesh((jax.device_count(),), ('batch'))
sharding = NamedSharding(mesh, P('batch'))

# our "data loader". each process loads a different set of "examples".
process_batch = np.random.rand(per_process_batch_size, 2048, 42)

# assemble a global array containing the per-process batches from all processes
global_batch = jax.make_array_from_process_local_data(sharding, process_batch)

# sanity check that everything got sharded correctly
assert global_batch.shape[0] == batch_size
assert process_batch.shape[0] == per_process_batch_size
assert global_batch.addressable_shards[0].data.shape[0] == per_device_batch_size
jax.make_array_from_single_device_arrays()是构建跨进程数组最通用的方法。它通常在执行jax.device_put()以将所需数据发送到每个设备之后使用。这是最低级的选项,因为所有数据移动都是手动执行的(例如通过jax.device_put())。这是一个例子
shape = (jax.process_count(), jax.local_device_count())
mesh = jax.make_mesh(shape, ('i', 'j'))
sharding = NamedSharding(mesh, P('i', 'j'))

# manually create per-device data equivalent to np.arange(jax.device_count())
# i.e. each device will get a single scalar value from 0..N
local_arrays = [
    jax.device_put(
        jnp.array([[jax.process_index() * jax.local_device_count() + i]]),
        device)
    for i, device in enumerate(jax.local_devices())
]

# assemble a global array from the local_arrays across all processes
global_array = jax.make_array_from_single_device_arrays(
    shape=shape,
    sharding=sharding,
    arrays=local_arrays)

# sanity check
assert (np.all(
    jax.experimental.multihost_utils.process_allgather(global_array) ==
    np.arange(jax.device_count()).reshape(global_array.shape)))